CW Practice Oscillator Run Down

I’ve been reading a thread lately in the LICW Google group and compiled this list of favored CW practice oscillators. I personally have struggled with building simple oscillators wanting more than what simple circuits can deliver. I have recently ordered a Morserino 2 which appears to be a great tool to use with students and also a great testing device for the shop when I finish a key and want to make sure it works correctly without actually hooking it up to my radio in the shack. —Steve—

Here’s the list:

The best way to learn Morse?

Well…it’s the Long Island CW Club of course! LICW has become the go-to place to study, learn and experience CW. With just over 1000 members as of this writing, they manage scores of online courses touching on all things Morse.

Here’s a “blurb” from their site:

The Long Island CW Club had been started in 2018 to promote and expand the use of Morse Code- CW amongst amateur radio operators, initially in our geographic area. Today there is no longer a FCC requirement to learn CW to obtain an amateur radio license. Yet we find there is still a pent up demand to learn the code, become more proficient at it and to take part in activities centered around this interesting skill. To help fill this void, we have put together a group of dedicated teachers of Morse Code – CW. We conduct CW training classes via internet video conference classes at various skill levels. We have grown quickly, branching out with members nationwide and overseas. Please see our Calendar for CW class times. Besides Morse Code classes, we are very active locally with regular ‘brick and mortar’ activities such as QRP outings, portable operations on a local museum ship and with BBQs, museum visits and quarterly luncheons at a historic inn etc. We also hold regular presentations on a variety of ham radio and Morse Code – CW related topics, also by internet video conference.

Be there or be square…..Oh, and be sure to sign up for their google group. Lots of good stuff from students and old experienced ops.

www.longislandcwclub.org

73,

Steve—W1SFR—

W1SFR Green Machine Cootie Video

I finally got around to putting up the new video of the Green Machine Cootie key with the Vermont marble base. The video shows a special edition of the key with the SKCC logo on it (no longer available) and was initially offered as a hardwired cootie key. I now offer the option of having it wired as a standard paddle with a stereo to mono adapter to switch to cootie mode, or made with a stereo cable and jack but hardwired as a cootie by adding a jumper across the two contact posts (which can easily be de-soldered)

Elecraft K1 Display DIY LED Backlight

Update 8/4/2020:

I had occasion to take the front off my K1 to check something so I went ahead and added some appropriately sized heat shrink over the ATTN/RIT LED and now absolutely no light spill from the LED’s. 

Well, I have a thing for K1’s and have built several over the years. For me, it’s everything a QRP rig should be.

I sold my last one that was totally tricked out with everything you could possibly put on a K1 including the spot filter LED, ATU, Noise blanker and Elecraft backlight kit.

Well that was a stupid move which I regretted. A friend of a friend had one on the shelf that he wanted to get rid of but it was totally stock with NO added features. I set out to bring it up to snuff.

My first task was to make a display backlight because the display is very hard to read without some direct light on it. Since there are no more backlight kits available from Elecraft I went looking for some ideas. I found some posts on the Elecraft reflector about using LEDs on either side of the display. That seemed like a good idea so I ordered some green LEDs. Since LEDs come in different voltages, I got some small LEDs rated at 3V. Using 2 on each side of the display wired in series, it enabled me to tap into the 12V supply on the display board without using any resistors to modify the voltage.

I used some stiff white paper and cut a couple of strips on either side of the display allowing for a couple of cutouts for a capacitor and resistor on the board and laid the paper down with a couple of very small dots of 3M blue tak (if you never heard of it, get some…it’s very handy stuff). I mapped out the positions of the leds making sure I got the sequence of the leads correctly; Cathode(-) to Anode (+) to Cathode to Anode and so on until the last LED lead was + which connected to the ground of the board on the left.

I finished it off with an 8mm strip of velcro material which was still enough to hold its shape and yet allow me to snake it around the components. I used the blue tak to keep it in place. This helps with light spill from the LEDs. It’s not perfect and there still is some minor light spill but for me it’s perfectly acceptable.

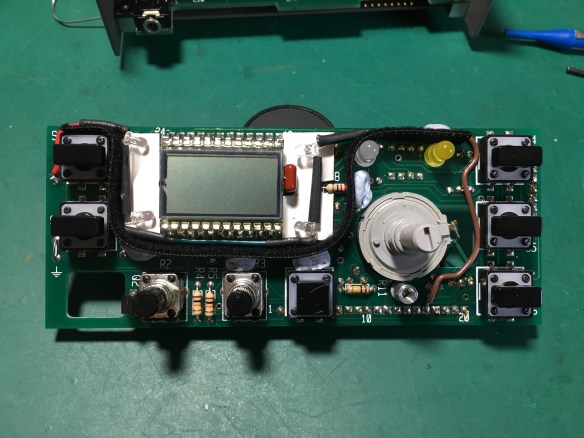
Here’s a picture of the final layout. The 12V is coming from pin 16 of the IC at the bottom right of the board to the ground (red wire top left).

Here’s a picture of what it looks like from the front panel with power on. There’s still a slight amount of spillover to the RIT/XIT LED but when RIT of XIT is activated the spillover is completely overridden. I decided to live with that instead of further attempts too completely eliminate spillover. A simple solution would be a length of heatshrink from the base of that LED to the underside of the front panel.

LED Backlight DIY

Got an itch to try a Cootie Key?

Many folks that have purchased W1SFR keys eventually get a hankering to use them as a Cootie key. There are a couple of simple ways to do that. The easiest way it to get a 3.5mm stereo to mono adapter. Of course you’ll have to consult your radio manual and do what is necessary for it to accept a key in straight key mode.

The other way is to simply short the two contact posts under the base of the key. That can be as simple as a couple of alligator clips to a hard bridge soldered between the two posts. Either way you will most likely want to increase the contact spacing a bit to give you a bit more room to get your swing going cuz it’s a different feel than using it in paddle mode.

Here’s my most recent key, the “Torsion Bar Cootie/Paddle”. It comes wired as a regular single lever paddle, but is easily converted. Because the action is low to the deck, and the key has some decent rubber feet (not those stick on jobs, but real rubber feet with screws tapped into the base) it’s pretty amazing how well it sticks when in use. The contact mechanism is also a big contributor to it’s smooth action.

Sending with a cootie key is so much more personal than a standard paddle. Because you control the spacing, duration, and timing of every dit, dah and in between, your messaging takes on a whole different “feel”. Now…I’m not talking about sending out a bunch of slop, but like listening to a good bug op, a good cootie op is a joy to listen to.

Want to hear what some great sideswiper ops sound like? Give a listen to the guys on the sideswiper net. There are several nets around the world at different times, so it’s best to go to the http://www.sideswipernet.org website and check out the schedules. I try to make the Thursday night net on 7044 at 8PM DST. Also on the site is an amazing compendium of information about swipers and tons of pictures of keys made by scores of cootie lovers.

See you on the net!

Steve, W1SFR

Compendium of Automatic Morse..new book by N3CW

Check out page 150 and you’ll see a full page devoted to the Torsion Bar single lever key made by yours truly!

Trace the evolution of automatic Morse code devices from the early 1800s to today through this informative text and over 1,100 photos. Beginning with an overview of telegraphy and early key history, fifteen sections explore the equipment used to send messages over long distances. Featured are code readers, oscillators, Morse trainers, electronic keyers, single- and dual-lever paddles, portable paddles, automatic mechanical keys, accessories, and more. Each device is presented in text and images, some with classic advertisements; this combination allows the reader to appreciate device development and better understand the thinking that went into the design. Paddle and key maintenance and adjustment are also examined, as well as computer interfacing and use of the Internet. The book also includes the results of patent studies and historical research, with many new findings presented, making it a must-have for collectors, ham operators, or anyone interested in the history of these communication devices.

Ed Goss has been a licensed amateur radio operator (N3CW) for almost 50 years. He operates almost exclusively using Morse code, and collects unique telegraphy devices. Ed is a retired engineer and lives in Palm Coast, Florida.